vue3_computed_5">一、vue3 computed计算属性
计算属性就是当依赖的属性的值发生变化的时候,才会触发他的更改,如果依赖的值不发生变化则使用的是缓存中的属性值。
<template>
    <div>
      <input type="text" v-model="firstName">
      <br>
      <input type="text" v-model="lastName">
      <br>
      <span>{{name}}</span>
      <br>
      <button @click="change">触发computed的set()属性</button>
    </div>
</template>

<script setup lang='ts'>
import { ref, computed } from 'vue'
let firstName = ref('')
let lastName = ref('')

// computed的第一种写法,直接传一个回调函数进去即可
// 只有当计算属性中的参与变量任意一个发生变化时才会重新计算
/*
const name = computed(()=>{
  return firstName.value + lastName.value
})
*/

// computed的第二种写法,传一个对象进行,这个对象有约束的

const name = computed({
    get(){
      return firstName.value + lastName.value
    },
    // 给name.value赋值才会调用set()
    set(newValue){
      firstName.value = firstName.value + newValue
    }
})

const change = () => {
  name.value = '888'
}

/*
使用computed的一些注意事项:
1、计算属性的getter应只做计算,不要在getter中做异步请求或者更改DOM
2、从计算属性返回的值可以把它看作是一个临时快照,每当源状态发生变化时,就会创建一个新的快照
   更改快照是没有意义的,因此计算属性的返回值应该被视为只读的。应该更新它所依赖的源状态以触发
   新的计算。
*/

</script>

<style lang='scss' scoped>

</style>
经典的购物车案例
<template>
    <table class="table">
      <tr>
        <th>商品名称</th>
        <th>商品数量</th>
        <th>商品价格</th>
        <th>操作</th>
      </tr>
      <tr v-for="(item, index) in data" :key="index">
        <td>{{item.name}}</td>
        <td><button @click="addAndSub(item, false)">-</button>{{item.num}}<button @click="addAndSub(item, true)">+</button></td>
        <td>{{item.price * item.num}}</td>
        <td><button @click="del(index)">删除</button></td>
      </tr>
      <tr>
        <td colspan="4">总价:{{total}}</td>
      </tr>
    </table>
</template>

<script setup lang='ts'>
import { isTemplateNode } from '@vue/compiler-core';
import { ref, computed, reactive } from 'vue'
type Goods = {
  name: string,
  num: number,
  price:number,
}

const data = reactive<Goods[]>([
  {name: '冰棒', num: 1, price: 2},
  {name: '饼干', num: 1, price: 5},
  {name: '红牛', num: 1, price: 6},
])

let total = ref(0)
// computed泛型约束返回值为number
total = computed<number>(()=>{
  // reduce 参数,prev前一次计算的值,next此次的对象
  return data.reduce((prev, next) =>{
    return prev + (next.num * next.price)
  // 下面的参数0表示前一次的值,我们赋值为0
  }, 0)
})

const del = (index:number)=>{
  data.splice(index, 1)
}

const addAndSub = (goods:Goods, flag:boolean) => {
  if(goods.num > 1 && !flag){
    goods.num--
    return
  }
  if(goods.num < 99 && flag){
    goods.num++
  }
}

</script>

<style lang='scss' scoped>
.table{
  text-align: center;
  width: 100%;
  th,tr,td{
    border: 1px solid red;
    text-align: center;
  }
}
</style>
默认使用vite安装的vue脚手架有很多功能及配置都没有处理,使用scss需要安装的依赖包
npm install --save-dev sass-loader
npm install --save-dev sass
二、Vue3 watch侦听器
watch需要侦听特定的数据源,并在单独的回调函数中执行一些事情
watch第一个参数监听源,第二个参数回调函数callback(newVal, oldVal),第三个参数一个options配置项是一个对象{immediate:true,//是否立即调用一次 deep:true //是否开启深度监听 }
watch数据源发生改变,执行一个回调。
对象嵌套很多层,ref需要写deep:true才能监听到,而reactive不需要写都可以监听到
<template>
    <input type="text" v-model="message1"> <br>
    <input type="text" v-model="message2">
</template>

<script setup lang='ts'>
import { ref, watch } from 'vue'

let message1 = ref<string>('')
let message2 = ref('')
// watch侦听器
watch([message1, message2], (newVal, oldVal)=>{
  console.log('新的',newVal)
  console.log('旧的', oldVal)
})

</script>

<style lang='scss' scoped>

</style>
三、Vue3 watchEffect高级侦听器
watchEffect:立即执行传入的一个函数,同时响应式追踪其依赖,并在其依赖变更时重新运行该函数。
<template>
    <input type="text" v-model="message1"> <br>
    <input type="text" v-model="message2">
</template>

<script setup lang='ts'>
import { ref, watchEffect } from 'vue'

let message1 = ref<string>('')
let message2 = ref('')

// 参数回调函数可以传一个参数,
// 这个参数是监听之前做的一些事。
watchEffect((beforeHandler)=>{
  // 可以监听到message1.value值的变化
  console.log(message1.value)
  beforeHandler(()=>{
    console.log('监听触发最先做的事情,每触发一次都执行一次')
  })
})

</script>

<style lang='scss' scoped>

</style>
四、Vue3组件
每一个.vue文件都可以充当组件来使用,每个组件都可以复用。
通常一个应用会以一棵嵌套的组件树的形式来组织。
建一个组件
A.vue
<template>
    <div>
        <h2>我是A组件</h2>
    </div>
</template>

<script setup lang='ts'>
import { ref, reactive } from 'vue'

</script>
<style lang='scss' scoped>
</style>
使用上面建好的组件
<template>
    <A></A>
    <!-- 复用 -->
    <A></A>
</template>

<script setup lang='ts'>
import { ref, watchEffect } from 'vue'
//组件在vue3中直接引入就可以使用了
import A from './components/A.vue'
</script>

<style lang='scss' scoped>

</style>
五、Vue3生命周期
<template>
    <div ref="div">{{per}}</div>
    <button @click="update">触发更新钩子</button>
</template>

<script setup lang='ts'>
import { ref, onBeforeMount, onMounted, onBeforeUpdate, onUpdated, onBeforeUnmount, onUnmounted  } from 'vue'
// beforeCreate created setup语法糖模式没有这两个生命周期 setup去代替
console.log('setup')
const div = ref<HTMLDivElement>()
const per = ref('张三')

const update = ()=>{
    per.value = '李四';
}

// 创建
onBeforeMount(()=>{
    // 创建之前div.value=undefined
    console.log('DOM创建之前----->', div.value)
})
onMounted(()=>{
    // 创建之后div.value=<div></div>
    console.log('DOM创建完成---->', div.value)
})

// 更新钩子, 响应式变化触发
// DOM更新之前
onBeforeUpdate(()=>{
    console.log('DOM更新之前---->', div.value?.innerText)
})
// DOM更新之后
onUpdated(()=>{
    console.log('DOM更新之后---->', div.value?.innerText)
})

// 组件销毁
// 组件销毁之前
onBeforeUnmount(()=>{
    console.log('组件销毁之前,关闭这个组件的显示即销毁')
})
// 组件销毁之后
onUnmounted(()=>{
    console.log('组件销毁之后')
})

</script>

<style lang='scss' scoped>

</style>
六、less和scoped
Less(Leaner Style Sheets)是一门向后兼容的css扩展语言。
Less仅对CSS语言增加了少许方便的扩展,这就是Less易学的原因之一
在vite中使用less需要安装的依赖包
npm install less less-loader -D
scoped:实现组件的私有化,当前style属性只属于当前模块。
建一堆组件进行布局:
PS:注意组件是如何创建及引用的
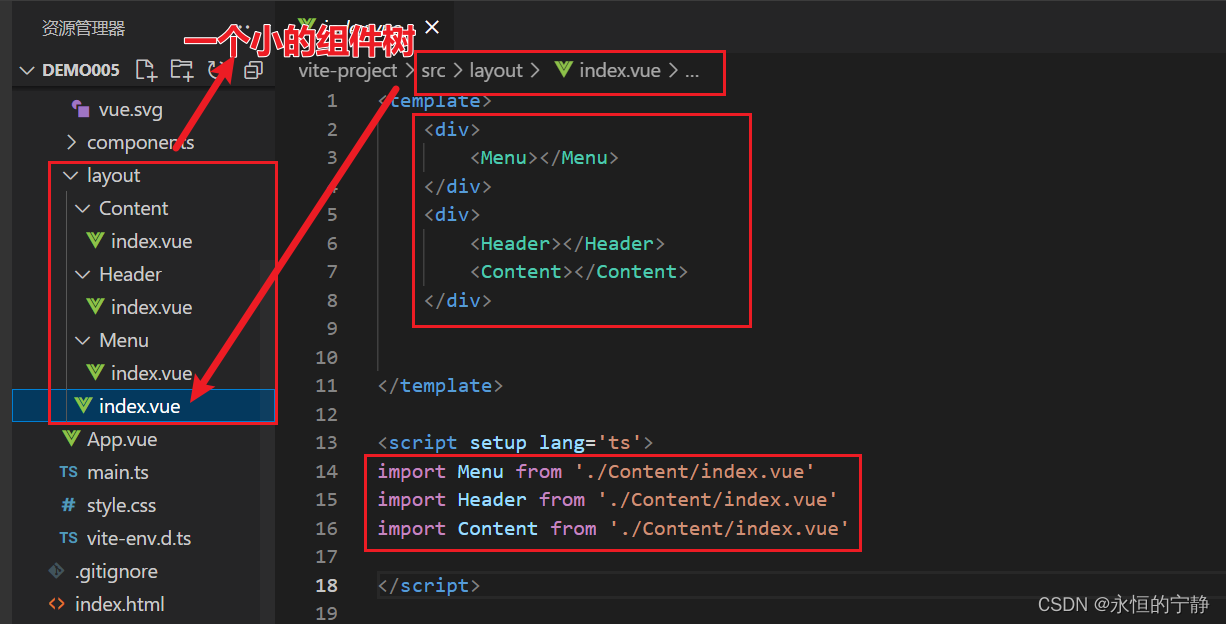
在App.vue中引入上面创建的这棵组件树(就是树形啦,方便成象好理解)
<template>
    <layout></layout>
</template>

<script setup lang='ts'>
import layout from './layout/index.vue'
</script>

<style lang='scss' scoped>

</style>
在main.ts中引入全局css样式
import { createApp } from 'vue'
import App from './App.vue'
// 引入全局样式,reset.less,reset.css,reset.scss都可以
// 需要安装相关的css预编译器
import './assets/css/reset.less'
createApp(App).mount('#app')